How I made my own earthbox self watering planters for my new greenhouse.
We just assembled our 6x8 Multi Line Greenhouse and we were trying to decide what kind of planter boxes we wanted. Our hope is to be able to grow vegetables over the winter. We live in the high desert at about 5000 feet. It freezes at night but gets warm during the day.
I looked into the Earthboxes online and they seem very nice and have good reviews. If money were no object I would have bought 5 or 6 of them.
After doing more research online I decided I could make my own Earthboxes. I purchased 8 - 18 gallon round tubs from Wal-Mart at about $6.00 each. They come in several colors.
Once I had the tubs chosen I needed to decide how I was going to make the water reservoir. Several other sites talk about using 2 Rubbermaid tubs. They cut the bottom portion of tub and turn it upside down to make the chamber for the water, that sounds good and I am sure it works. For me that was too expensive. Rubbermaid tubs are not cheap and using 2 for each Earthbox would cost too much.
I decided to just use some old plywood to make my chamber and to hold it up with 2" plastic tubing that we had lying around.
First I made a template (from the box the greenhouse came in) that was the size the wood would need to be for my chamber. I made the chamber to correspond to the first ring on the tub. The template was made out of a plastic material and it was easy to cut. Easier than cardboard I found.
Once I was happy with my template I cut one out of the plywood. I just used old scraps we had around and some we had received from our neighbor as he always checks with me before throwing away any lumber. As you can see I did not put the hole in the middle right in the middle. I wanted to leave a little extra room on one side for the watering tube.
I know the wood looks a little beat up but I figure it will last as long as my $6.00 tub.
Several sites mention using pond baskets for the wicking of the water to the soil. I bought some at Home Depot for about $2.50 each. I then went to the dollar store and found these plastic baskets for a dollar. I cut out the bottom of the basket and will install them upside down as I feel the top of the basket has more support.
I used a Dremel to cut out the bottom of the basket. It was easy to cut though the plastic did wrap around the Dremel cutter.
 |
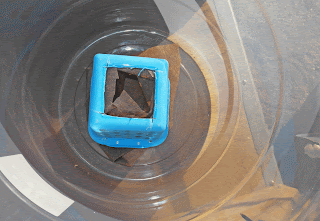
The basket in the tub before assembly
 |
This is how it looks in the template. The basket also provides some support to the wood.
 |
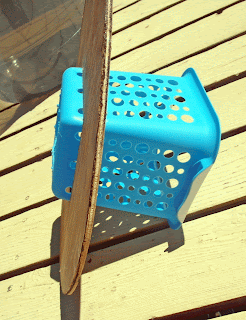
| side angle |
Once I got the wood and the basket I needed to cut some holes into the wood to allow water to drain. I also added some holes to the bottom of my blue basket.
Now I needed to make supports to hold my wood up and keep it above the water chamber. I again used my 2" plastic and cut 3 support legs for each tub. I cut the legs to be 5 1/2" each, or as close as I could get as our small chop saw could not cut the 2" pipe in one try and I had to turn it so not all the cuts are straight, but the bottom of the tub has a ring so nothing will be level anyway.
The water chamber holds 5 gallons of water.
 |
My tub filled with all my support legs.
 |
Here is a close up of the support leg. I also cut some holes into each leg using our small table drill press. This way the water will not get trapped in the legs. At least I hope the water will not get trapped.
Before installing each leg I added a few dabs of silicone on the top and bottom to help hold them in place.
 |
I cut the water tube to be 20" long and made a angle cut with the hacksaw on the bottom to make it easier for the water to drain into the tub. Here you can see the wood, with water holes and the blue wicking basket all in place.
I added some cheap landscape fabric on top of the wood to help keep the soil from falling into the water reservoir and to help protect the wood at least a little bit. I also used landscape fabric inside the blue basket to keep the soil inside the basket. The water should wick up to the main area of the planter box through the blue basket. I filled it up with soil and packed it tightly.
 | |||||
I made 8 - 18QT tubs for my 6x8 greenhouse. I used the Miracle Grow Moisture Control Pottting mix in the 64QT bags. 1 bag will almost fill 2 pots.
I left a little room for the 3 planters on my deck. I hope they will over winter in the greenhouse and not freeze. I am also going to add 1/2" bubble wrap to the inside of the greenhouse to help insulate it. As you can see I also have 5 gallon tubs filled with water. They raise my tubs and also will provide heat during the night.


No comments:
Post a Comment